Introduction
This month’s tip is all about how to use a compass in the context of mountain walking/hiking. There’s something in it for everyone. For the experienced navigator, maybe it will prompt some reflection on your own techniques. Or for the intermediate, perhaps it will help consolidating some of your learning and clearing up some misunderstandings. Finally, for the novice, it may be an introduction and something to refer back to later. It may also help you to prioritise your own learning.
The article will focus on a couple of things that some beginners struggle with the most; but also which some more experienced folk seem to have misunderstood. I see both cases quite frequently on my courses.
I’m going to describe the different uses to which you can put a compass to help with your navigation. Yes, there is more than one way! Having explained these, I’ll then make an observation about the proportion of time that I use each technique. Hopefully, this will help you use yours in the right way at the right time and avoid unnecessary hassle.
It doesn’t matter exactly what make or model of compass you have, assuming it’s appropriate for your needs. A typical compass, and one that I would certainly recommend, is the Silva Expedition 4. This is the type in the photos in this article.
Table of contents
Popular misconception about navigating with a compass
Many people either know, or aspire to know, how to “take a compass bearing”. They have a fixed idea of what this entails (most likely correctly, from a technical perspective). But they also assume that this is the only use of a compass. They conclude that it is the best way to use a compass in every possible set of circumstances.
This perception leads to people taking and following accurate compass bearings along distinct footpaths in perfect visibility. In cases like this, there simply is no need. While this isn’t “wrong”, it’s an unnecessary complication and a waste of effort.
A simple analogy is the Swiss Army knife. Imagine buying one but using only the corkscrew for every possible purpose. The corkscrew could probably cut through something if you kept at it long enough. However, the best tool for cutting is the knife blade. The other tools have their purposes too. In reality, you will most likely use the main knife blade the most, followed by some of the other tools. The corkscrew will only ever making a rare appearance. (Of course, this rather depends how much wine you drink when you are out in the mountains.)
The compass is a little bit the same.
How to use a compass – 97% of the time
Here are the different ways that you can use a compass to aid navigation when mountain walking/hiking.
1. Using the compass to find North
The most basic use of the compass is using the compass needle simply to identify where North is. The red end of the magnetic needle points (approximately, but accurately enough) to North. Sometimes, simply knowing where North is, is enough to make everything else fit into place. In one manner of speaking, that is all that a compass does in any case. All the additional components such as etched lines, measurements and dials are added features which have their uses. But without the needle to point North they have little or no value anyway.
In the photo below, I have ‘greyed out’ the parts of the compass that I am not using for the task in hand.

2. Using the compass to orientate the map
Effective and successful navigation comes much, much more easily if we hold the map the right way up. ‘The right way’ is when north on the map (the top) is facing actual North on the ground. We call this ‘orientating the map’. Most of the time we can orientate the map simply by matching features on the ground to symbols on the map.
Sometimes, however, this isn’t possible. In darkness or poor visibility, such as low cloud, we can’t see enough to achieve this. But we can use the compass to find North and then align our map so that the top of the map faces North.
A common misunderstanding, even amongst experienced folk, is that to achieve this requires more work than it actually does. I often see people placing their compass very accurately on the map and turning the dial. None of this is required as the two pictures below show.
By way of ‘proof’ that this isn’t complicated, here are two photos. The first picture shows a compass being used to find North. The map, in a different hand, is held so that the top of the map also faces North. That’s it! Nothing more.

We can do a slightly better job of this alignment, however. We can physically place the compass onto the map surface (any-old-how). Then we turn the map and compass as a single unit until the top of the map faces North. The map is now oriented as before, but slightly more accurately.
Once again, most of the compass has been greyed out in the photo. The only thing I am using is the red magnetic needle.
Now that the map is orientated (facing the right way), I can plan the next part of my journey.
3. Using a compass to take a quick (or rough) bearing
Let’s suppose now that the navigation has become a little more tricky. Maybe I need to head off in a particular direction but I can’t see an actual path; or I can see several paths but I’m not sure which one to take.
We can use the compass and map together to take a quick bearing. This will point us in the right direction as we get going. The photo below shows how to do this.

Taking a quick bearing
First, we line up our compass with the route that we want to follow. The edge of the compass baseplate works fine but I like the thin black line etched into the compass. In Step 1 (above), I have placed the black line of the compass on the line of the path (the dashed line on the map). We then hold the compass firmly in place. Now we rotate our entire body, holding the map and compass as a fixed unit. We rotate until the top of the map (North) lines up with the red compass needle (North) – Step 2. This is exactly the same as in orientating the map, above. Finally, in Step 3, we can look along the line of the ‘Direction of Travel Arrow’ (within the green oval, 3). This points us where we should walk.
Comparing a quick bearing with a GPS
For those who are more used to technology than a map and compass, this sequence gives exactly the same result as setting a GPS or smartphone to auto-align to north. Most people will be familiar with the feeling of the map screen rotating so that the direction we wish to walk is always ‘straight ahead’ on the map. But when you think about it, the map isn’t rotating – it’s staying fixed to North. It is us who are rotating around the map. Experiment with this and see for yourself.
If necessary, you can keep checking that you are still going in the right direction. It’s vital that the compass has not slipped from its place on the map (1) and the magnetic needle is still aligned with North on your map (2).
Compass Uses vs Proportion of Time
Before moving on to the final compass technique, I am just going to digress. I will consider how often I use these techniques. If I look back over my entire mountain walking life, or the last year, or the last week, then I can probably say:
- 80% of the time I do not use my compass. It is just there in my pocket. I navigate by matching the features on the ground with the symbols on the map. This is very easy in good visibility (once you have learned). Even in intermittent visibility, once you have got more practice, it’s still the most natural and effective thing to do.
- 10% of the time, I might need to get my compass out of my pocket to help me orientate the map. This is most likely to be when the visibility is poor (such as night-time, or low cloud). It may also be when the terrain is featureless or confusing for any reason. Having orientated the map with the compass, things then usually make more sense. Once I have planned my next part of the journey the compass goes back in my pocket.
- 7% of the time I may need to be sure of exactly which direction I am about to set off on. This is where the ‘quick bearing’ technique comes into play.
Those three techniques account for 97% of my navigational time. At no stage have I needed to twist the dial on the compass and at no stage have I needed to make a note of any numbers or do any maths.

How to use a compass – 3% of the time
The final compass technique is the one that most people use by ‘default’ – taking an accurate compass bearing. Yet I reckon I use this only 3% of the time. This 3% will occur only when the accuracy of my navigation is crucial. For example, I may be close to cliff edges and the visibility is poor (such as on Ben Nevis). Or I may need to find a very specific point on the ground. Most often, for me, this will be in a winter blizzard or white-out. Thick fog and total darkness are other possible occasions.
Using a compass to take an accurate bearing
There are three main steps to this.
Step 1
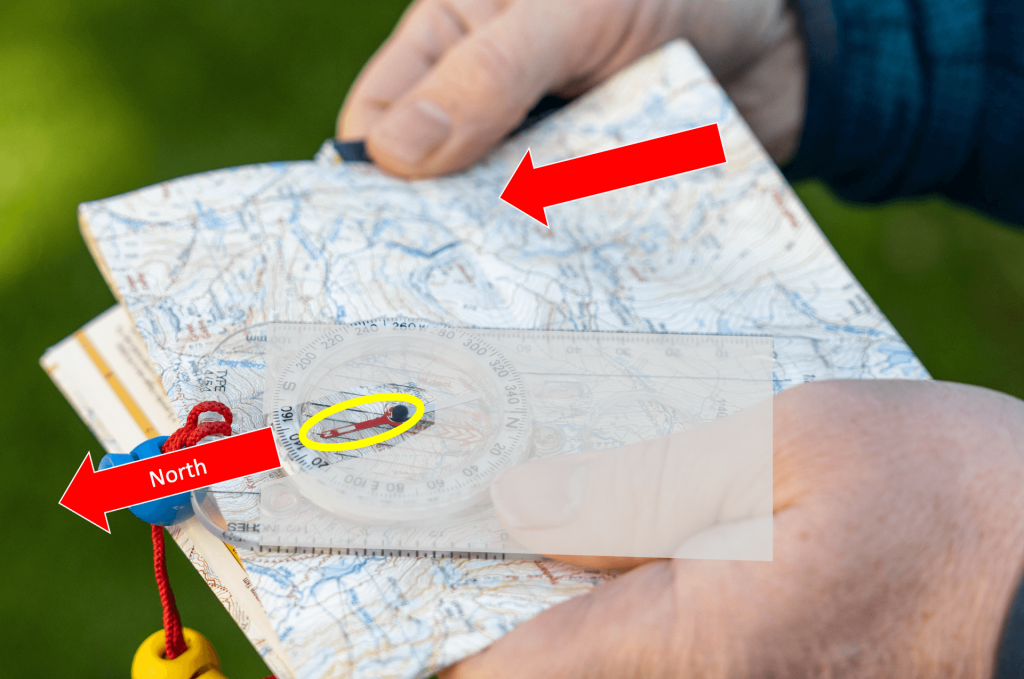
Step 1 starts the same as for a quick or rough bearing. Line the compass up with the line of the route that you want to travel (the green oval, 1, below). Now, holding the compass very still on the map, twist the dial (2) until the stripey arrow drawn inside the dial points to North on the map (inside the yellow oval on the photo). There are other handy guide-lines in the dial too. These help make sure it is running truly straight up and down (North-South). But watch out for the easy trap of getting the lines all straight but the arrow pointing to the bottom of the map (South) not the top (North).
Notice that in this step it doesn’t matter where the magnetic needle is pointing. We will come on to that in a moment. Just make sure the stripey arrow is lined up with North on the map. Check that the compass didn’t move and that it still lines up with your route (1).

Step 2
Now for Step 2, the part that novices hate and get very confused about. But the good news is that I’ll explain what you must understand – and then why you can probably ignore it for now! Hurray!
What you must understand
Earlier I said that the magnetic needle points approximately North. Most people agree that when we say ‘North’ we probably mean the North Pole. Therefore, folk assume or hope that the compass needle points to the North Pole. Sadly, this is not the case, because the earth’s magnetic field pulls the needle off to one side. How far it is pulled off to the side depends firstly on where in the world you are. Secondly, because the magnetic field is slowly changing all the time, how far your needle is pulled off depends on when you are using it. Annoying, isn’t it?
Next, you have to understand that for centuries map-makers have struggled with representing the curved surface of the earth on a flat piece of paper. Unsurpringly, they haven’t yet solved this problem without distorting some of the lines and shapes. That means that the top of your map and the lines on it also don’t point to the North Pole.
The upshot of all this is that to use an accurate compass bearing you will have to apply a correction. Depending on where in the world you are, and when you are doing this, you will have to add or subtract a few degrees from the numbers on the dial. This is something you should find out more about before you travel elsewhere in Europe or to another continent. The correction that you need to apply could be very significant.
Why you can probably ignore this for now
Now the good news. All of this additional complication can safely be ignored if you are using a map in the UK, probably for the next 10 years or so. This is because the correction that applies to the UK at the moment is pretty much 0 (zero) degrees.
Step 3
Having completed Steps 1 and 2, now comes Step 3. Having made the numerical correction to the dial, taking care not to disturb it further, take the compass off the map. Hold it out flat in front of you, with the Direction of Travel Arrow (in the green oval below) running straight away from your belly-button. This is the way your body would naturally walk.

Now slowly rotate your entire body, like a pirouette, keeping the compass itself fixed at your belly button. As you rotate, the red magnetic needle will appear to be rotating too. (But think about it – that needle isn’t actually moving, it’s staying fixed to North. Rather, it is you and your map and compass baseplate that are rotating around the needle). Keep rotating your body until the red stripey needle in the dial and the red magnetic needle are both perfectly in alignment. This is shown in the yellow oval (3).
Once you have aligned these two perfectly, then the Direction of Travel Arrow (in the green oval) is now pointing at your target. You can set off walking in that direction (4).
If you already know how to do this, then that’s great. If you don’t, then it’s not really a skill to learn only from a book or article (like this). It’s much better to learn in practice with someone showing you. But for this article I wanted to explain it to show just how much extra effort is involved. Yet it’s the technique which everyone thinks “this is how you use a compass”. It becomes the ‘go-to’ technique to employ.
So what?
So, what are my main points here? Am I saying that to navigate effectively you don’t need to know how to use this technique? No, not at all. I have said that I only use it perhaps 3% of the time – but I’ve also said that when I do use it, my life may depend on doing it properly.
But here are the lessons I think we can draw:
- There are several ways to make effective use of a compass in navigation. Choose the one that is most appropriate for the task in hand.
- Taking an accurate compass bearing is more complicated and involved. It also takes a little more time. Make your life easier by using it only when it’s absolutely necessary.
- Taking an accurate compass bearing is tricky until it has become second nature. If you are just starting out learning, make life easy for yourself by using the other techniques to start with. By the time you have used them repeatedly you will be much more comfortable handling your compass and things will begin to ‘click’ into place. Once you have mastered these, then the final step, progressing on to accurate bearings, will be much easier to learn.
Summary
- There are several ways to navigate with a map and compass combination. Effective navigation will make the best use of the most appropriate technique at the time – the right tool for the job.
- Most of the time (80%), I don’t even use a compass at all as the map tells me everything I need to know.
- Sometimes (10% of the time), I’m not sure which way to hold the map (perhaps because of cloud), so I use the compass simply to orientate the map. Once the map is facing the right way, I no longer need the compass.
- At other times (7% of the time), I need a little more accuracy or certainty. So, I use the map and compass in combination to take a quick bearing to show me which way to head. Once I have set off, I can probably put the compass away again (though not always).
- For 97% of my time navigating, I don’t need the compass dial or to do any adding or subtracting.
- On a very small number of occasions, when I need highly accurate navigation, I use an accurate bearing. To do this, first I need to know what correction I should apply to the compass. This correction will be based on where I am in the world and what the year is. I need to find out what the correction is in advance.
- If you are learning, try learning the skills that you will need 97% of the time and master these first. You are unlikely to be in a situation where you need the skills for 3% of the time straight away.
- Once you have mastered the easier skills (the 97%) then learning the harder skills (3%) will no longer be quite so hard!